
What is Placket in Garment?
A placket is a finished opening in a garment section. Plackets are used on front or back neckline openings instead of a zipper. A placket can be made of two finished strips of equal width applied to a garment opening of any length. The two strips overlap, and the top strip is visible on the correct side of the garment.
A placket is an opening in the waist portion of trousers or in the neckline of a skirt. They can also be found at the cuff of a sleeve in a garment. Plackets facilitate easy usage of clothing and are sometimes used as a component for enhancing the design. Facings or bands are attached in a modern placket to incorporate buttons, snaps or zippers. In designer garments, a placket is a double layer of fabric that contains buttons and buttonholes in a skirt.
A concealed front placket can be constructed from this method as well, and is used in high-end garments at the center front, or on the back. This is especially effective when matching plaids, stripes, or print patterns when a visible closure would interrupt the design. At the neckline, the placket can be sewn with or without closures and with or without collars. A placket can be both functional, by providing a finish to an opening, and decorative, enhancing the garment opening with contrasting color, fabric, or shape Plackets are found on sleeves and at neck openings, as well as on skirts, pants, or shorts.
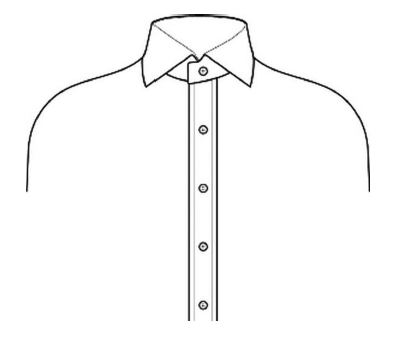
Plackets are made by interfacing more layers (generally more than one) of a fabric to impart strength and support to the garment as it is subjected to stress when worn. To protect the wearer from fasteners coming in contact with their skin and to hide underlying clothing, the two sides of the plackets are overlapped. Figure 1 shows a diagram of a shirt placket.
Different Types of Plackets in Garments:
Plackets are finished slits or faced openings designed on all types of garments—bodice, sleeve, skirt, dress, jacket, pant, and so forth. Plackets can be of any length and width, with blunt, pointed, rounded, or stylized ends. Some plackets have buttons and buttonholes; others do not. When designed for neckline openings, the placket can end at the neck edge or be extended beyond the neck and become part of the collar. Any sleeve stitched to an open cuff needs a placket stitched in the sleeve up from the wrist. The position of the placket is important-it is placed at the back of the sleeve in line with the elbow. There are various types of plackets explained in this article.
Continuous Placket:
If you look around the stores, you will notice that the continuous placket is one of the most popular plackets in sleeves. A separate binding is stitched to enclose both raw edges of the split. The cuff will be stitched edge-to-edge with the placket, so no notched extension is needed. It is a functional and practical placket opening to use for shirts and blouses.
Continuous Lap Sleeve or Bound Placket:
A continuous lap sleeve or bound placket is a common finish that facilitates dressing ease in blouses and shirts. The opening is similar to the legs of a dart, which looks like a long thin triangle and the dimensions of the placket are normally mentioned on the sleeve pattern.
Construction of continuous bound plackets:
Band Preparation:
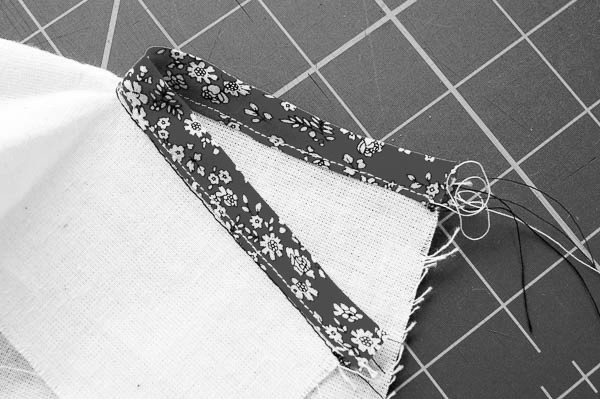
During cutting operation, a piece of placket binding had to be cut from the same base fabric used for the main garment panel. Based on the customer requirement, the placket can be on the straight grain or on the bias. In case of a decorative effect, the plaids and stripes are cut on the bias. The placket band should be twice as long as the placket opening marking, with an addition of 1″ and 1¼″ wide. Under one long edge of the band of ¼″ the pressing operation is carried out. Figure 2 shows a sample view of a continuous bound placket.
Placket Opening:
In the garment, the placket marking is made by using a tracing paper or soluble marker that is easily removable. During the binding operation, the upper opening of the placket and the pivot point are indicated by dots. In order to make an opening, stitching has to be done along the triangle legs and while approaching the point the stitches per inch could be reduced.
After reaching the point, the presser foot should be raised for turning the stitch while the needle remains in the fabric. Then, with the 1″ stitch length, stitching has to be carried out from the point to the other side. Slashing operation should be carried out without locking of threads up to the point and between the stitching lines. The stitching should coincide with the band ¼″ seam allowance, but tapering to near nothing in the center. Without creating a tuck at the placket point, the band is assembled to the sleeve opening using an even ¼″ seam allowance. The seam is to be pressed flat during stitching. To get a proper finishing to the placket, the seam should be flat pressed during stitching and the placket band should be folded beside the sleeve to cover the stitching line.
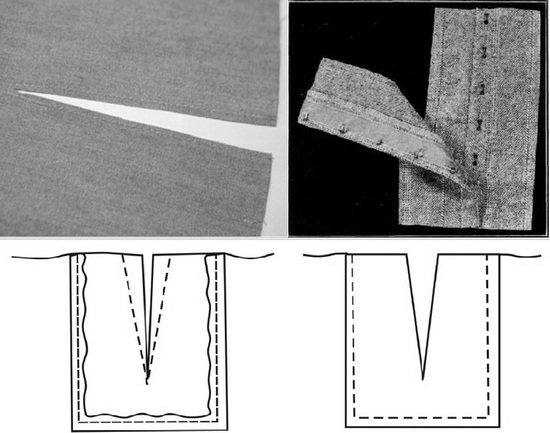
Two-Piece Placket:
Figure 3 shows the reference diagram of a two-piece placket. This kind of placket is mostly used as an opening in the left side of skirts or in petticoats and sometimes in the back side of dresses. A binding and the overlap with a facing is given as a finishing in the under lap side of this placket. For the overlap a fabric of width 1½″ is used. Another fabric having a wider width of 2½″ is used for the under lap. Both of these separate fabrics should be 1″longer than the placket opening. In the front part of a fabric (overlap side) narrow strip has to be stitched and the wider strip has to be stitched on the back side of the fabric (under lap side).
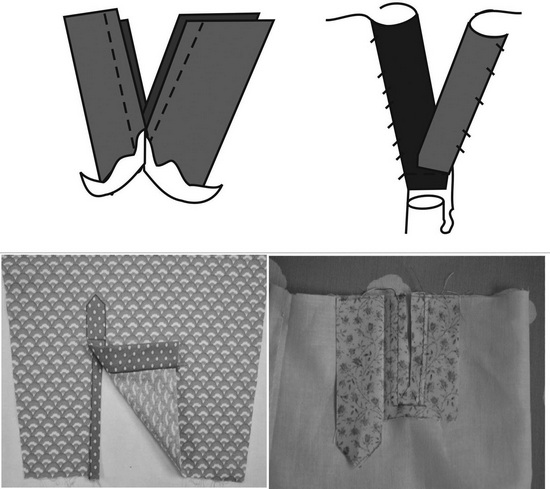
In order to get the stitching line of the placket and the stitching line of the seam of the garment in line with each other, the seam for the placket to be secured should be equal to the seam allowance used for fixing. An additional length of the fabric strip should be spread out underneath the placket opening. For under lap finishing, a crease mark has to be created with the strip over them and then the free edges which are present at the back side of the panel should be turned under ¼″ and hemming of fold to the stitching line should be done to form the bound side of the placket, which is around ½″ to ¾″ wide.
Similarly for finishing an overlap, a ¼″ or wider fold should be prepared to another side of its free edges so that the width of the binding in the under lap is equal to the distance from the stitching line to the fold line. The strip should be turned over to the back side of the garment and hemming of fold to be done. Then, a line of stitches is worked at the base of the placket holding the under lap and overlap together. This must be done by hand from the wrong side of the fabric so that no stitches are visible on the right side.
Miter Placket:
A miter placket or tailored placket provides an attractive look to the garment and also to enhance the strength (Figure 4). A miter placket is very often used in the sleeve opening area of men’s shirts, children’s garments, and in jibbas where a neck opening is needed. It may be utilized for decorative purposes in children’s and ladies dresses, where the color of the placket may be contrasting in order to enhance the aesthetic value of the garment.
Construction of Miter Placket:
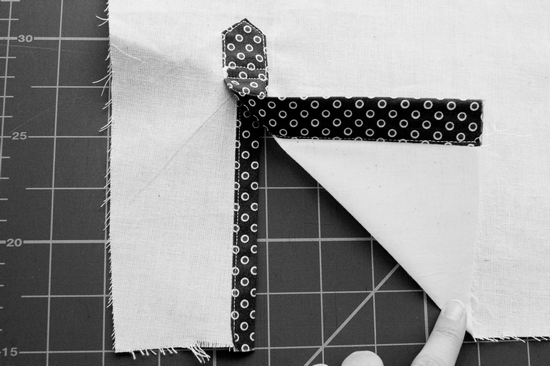
Prepare a strip whose width is 1½″ to match the exact length of the slit (5″) for making the under lap. Having a right side facing, one end of the fabric strip is kept exactly in line with the end of the slit. Now seam joining for about ¼″ is stitched and ¼″ of the fabric strip is folded to the underside of the free edge and is hemmed along the stitching line. Therefore, the under lap stitch exists on the back side of the garment.
In case of overlap, the 1″ wide plackets are usually shaped at the tip during finishing to give an attractive look. Similar to the under lap, for overlap a strip of 2¼″ wide, which is 1¼″ longer than the slit, is cut and then the seam lines are marked using a dotted line ¼″ inside the outer edge. The right side of the fabric strip is placed facing the back side of the garment. The small side of the fabric strip should be tacked at the free side of the placket opening on the seam line. After machine stitching the strip, the overlap fabric strip should be brought over the right side of the garment and beneath the seam allowance. In this position, top stitching of the fabric strip to the garment should be done and stitching downward until the sleeve opening also has to be carried out. Stitch twice across the overlap to hold the under lap firmly in position.
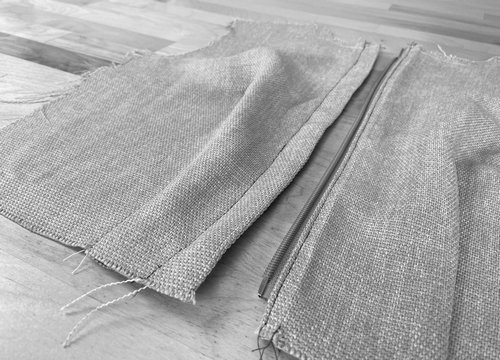
Zipper Placket:
Zippers are available in different sizes and are usually assembled to the garment panel using tape. Selection of the zipper depends on the size and the color of the placket required. Zipper plackets used in skirts, frocks, shirts, handbags, decorative purses and other garments are shown in Figure 5.
Construction of Zipper Placket:
An opening should be made in the garment and the zipper is chosen according to the opening size. A short slit of width ¼″ should be cut at the end of the opening, diagonally on both sides and then the formed edges are flipped to the back side and a tack should be done. A stitching as well as hemming of a square piece of tape is done at the end of the placket opening. The zipper is placed over this and attached to the fabric edge. Another square piece of tape with neatly finished edges is positioned such that it is covering the zipper edge and finished with hemming.
Faced Placket Open:
A simple faced placket open is illustrated in Figure 6. It is typically a simple neck finish used on infants’ and children’s clothes and night dresses. To make this, slashing of opening down from the neck at the center front or center back should be done and fitted facing is applied to the opening. Place facing piece right side facing the garment, do a row of stitch catching the garment more. Turn the facing to the wrong side and top stitch. Finish the facing by turning the edge and hemming.
Shirt-Sleeve Placket:
The shirt-sleeve placket is mainly seen on men’s shirts. It may look complicated to stitch but it’s simple once you get the hang of it! It is stitched using two separate placket pieces one small and one large. Take your time to perfect this placket, as it’s a classy look for shirts in women’s wear. No inter facing is necessary in the placket, but do mark the match points- they are important to the success of this placket.
Image courtesy: http://sewaholic.net
References:
- Apparel Manufacturing Technology by T. Karthik, P. Ganesan, and D. Gopalakrishnan
- Professional Sewing Techniques for Designers by Julie Cole and Sharon Czachor
- Patternmaking for Fashion Design by Helen Joseph Armstrong