What is a Master Pattern?
A master pattern is a block, usually it made of a thin cardboard, which can use to make the pattern on thin paper and then it cut out and pinned to fabric. A garment that fits well and has no virtually design details at all makes a great foundation pattern is called master pattern.
The master pattern is considered the pattern from draft garments to a perfect fit of the model. It is a pattern having a double contraction or shrinkage allowance. Sometimes master pattern is called as a master block or, basic block or, sloper.
Setting Up and Using Master Patterns:
A great-fitting base pattern may help to make a master Pattern. Spend the quality time to get the right fit. Future designs will be benefited from it.
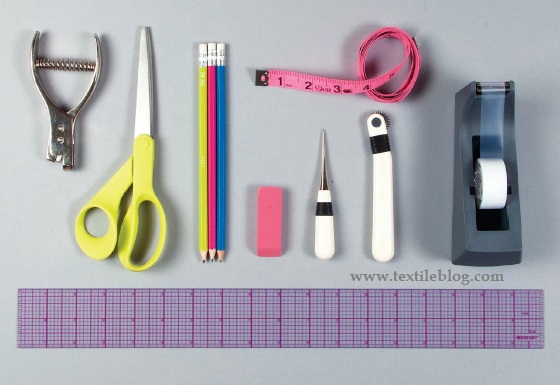
Tools of making a master pattern:
- Basic garment pattern
- Pencil
- Eraser
- Ruler
- Scissors
- Tape
- Tracing wheel
- Awl
- Notcher
- Pattern hooks
- Oak tag
- poster board, or chipboard
- Lightweight white paper on a roll, etc.
Role of Paper on Master Pattern:
In the master pattern, paper is going to be used over and over again. So marker producer must take care to copy the pattern onto a heavyweight paper. Special kinds of paper are used in master pattern. Oak tag, clipboard and poster board are used for marker making.
The objective of paper in the master pattern is easy to trace around the edges. The paper uses for pattern drafting should be lightweight, white, and ideally come on a roll. It will be fold easily and can be seen through it to trace pattern pieces.
Now, we’ll make a master pattern for pencil skirt.
Master Pattern for Pencil Skirt:
Body part:
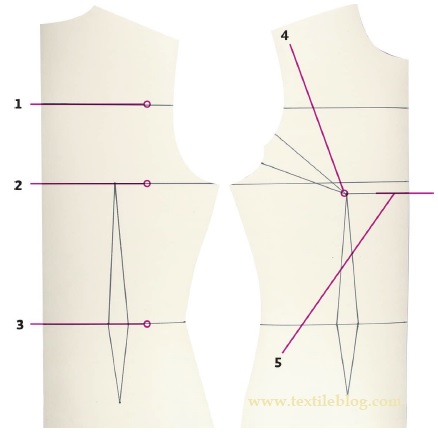
Process are described in below table:
| 1. Cross front and back: | Horizontally oriented guideline under the neck and shoulder are perpendicular to the center front or back. Cross front and back connects with the center to the armhole, before it begins to curve to the side seam. |
| 2. Bust: | Horizontally oriented guideline perpendicular to the center front or back. Bust connects with the middle to the bottom of the armhole at the side seam. |
| 3. Waist: | Horizontally oriented guideline perpendicular to the center front or back at the smallest a part of the body. Where darts are the fullest. On a skirt, top of the pattern and may be curved. |
| 4. Bust apex: | An awl punches at the fullest point of the bust. Bust apex is usually marked on commercial patterns. But make certain to mark its location on the body in a fitting. |
| 5. Bust apex guideline: | Horizontally oriented guideline perpendicular to the center front. That connects to the bust apex. |
Waist or hips:
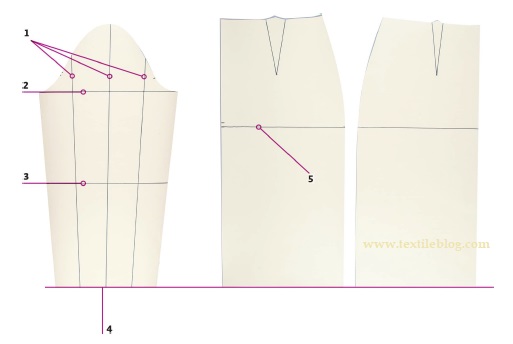
Process are described in below table:
| 1. Quarter lines: | Vertical guidelines are connecting the sleeve cap to the base. |
| 2. Bicep: | Horizontally oriented guideline connects the underarm seam of the sleeve front to the back underarm seam. It is the fullest a part of the sleeve. |
| 3. Elbow: | Horizontally oriented guideline is parallel to the base of the sleeve at the level of the elbow. This can be easiest to mark while wearing a fitting shell. |
| 4. Base: | Horizontally oriented guideline found at the bottom of the pattern. This could be placed at the favorite length for that garment. |
| 5. Hip level: | Horizontally oriented guide-line found at the fullest point below the waist perpendicular to the center front or back. It connects with the middle to the side seam. Hip level is commonly marked on commercial patterns. |
Inside leg measurement:
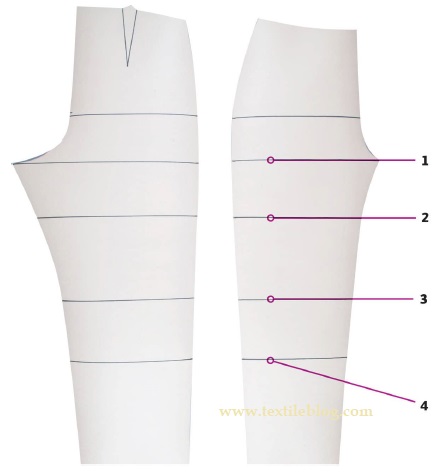
Process are described in below table:
| 1. Crotch level: | Horizontally oriented guideline is parallel to the bottom. And It is perpendicular to the grain line. That connects with the crotch point to the side seam. The crotch point is the points where the inseam meets the increase of the pant. The crotch level guideline on a pant front might not necessarily match the crotch level guideline on the side seam. |
| 2. Thigh: | Horizontally oriented guideline is parallel to the base. And it is perpendicular to the grain line about 7 inches above the knee. |
| 3. Knee: | Horizontally oriented guideline is parallel to the bottom. And it is perpendicular to the grain line at the level of the knee. |
| 4. Calf: | Horizontally oriented guideline is parallel to the bottom and perpendicular to the grain line about 5 inches below the knee. |
Master Pattern Measurements:
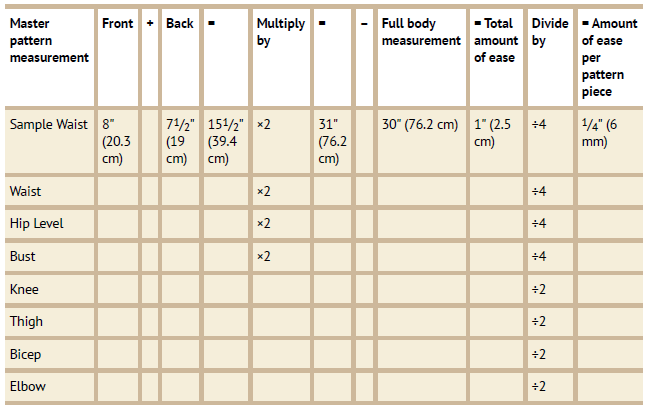
Write the measurements on each guideline of the master pattern. Don’t include dart take-up.
For example, if the front waist guideline measures 8 inches and incorporates a 1-inch dart. That intersects it; the waist measurement is 7 inches. These measurements include ease. Calculate what proportion ease exists on each guideline. Measure the body’s full circumference on any given guideline while wearing the master patterns.
Steps of Making Master Pattern:
- Take a paper pattern with all the guidelines, seemliness, and darts drawn into the oak tag.
- Press firmly with a tracing wheel to transfer seemliness, darts, and guidelines onto the template paper (excluding seam allowance).
- The tracing wheel leaves a dotted impression.
- Then draw over that with pencil.
- Cut out the template.
- Check the front and back are the same length at the sides and shoulder seams only. And remember that, darts can intersect these seam lines.
- Then check the bust, waist, hip level, thigh, knee, and hem guidelines match up along the sides.
- Adjust the guidelines as necessary to match.
- Use a notcher to notch the guidelines and dart legs on the perimeter of the master patterns.
- If don’t have a notcher, make shallow and narrow triangular cutouts of the guidelines and dart legs on the perimeter of the template paper.
- Use an awl punch to pierce the dart points. The darts will take-up within the interior of the pattern piece, and the bust apex.
- The notches and awl punches will be used to mark guidelines as begin to design new patterns.
- The master pattern should be kept flat. It can be hung from a pattern hook. So its shape doesn’t become distorted.
Seam Allowance:
The master pattern mustn’t include any seam allowance. Since all pattern pieces are known as “working patterns”. While in the design process, all will need seam allowance added to the pattern. It’ll be easier to form adjustments to the fit and build new style lines without seam allowance. Make sure, seam lines has drawn on the foundation pattern pieces.
Adding Ease:
Master pattern should be properly fitted so as for it to be a decent base. Adding extra ease can make certain garments feel more comfortable and look more relaxed.
How to Master Pattern Use in Design?
At first, up the master pattern and start the drafting. Place any lightweight white paper that comes on a roll under the master patterns. Trace around master pattern, then dipping the pencil into each notch and awl punch. Connect the notches on guidelines and notches to awl punches for darts.
Working pattern:
After making the flat pattern of a new design, it is still “working pattern”. Cause, it must fit into the new design. Never assume that a great-fitting master pattern will provide perfectly fitting new designs. New designs have to be sewn in muslin without any finishing details for fit testing.
Seam allowance must be added to the working pattern. Cause, master pattern is created without it. Add the seam allowance to the fabric only. It will be easier to adjust the working paper pattern without seam allowance.
Final pattern:
When the fitting is successful, make it as final pattern. A final pattern should be made of oak tag or drafting paper. The final pattern should have seam allowance. Bring the notches to the new edge of the paper. All darts, grain lines, cutting instructions, pattern name, and pattern piece name must be remembered to mark.
References:
- Designing Clothes with the Flat Pattern Method: Customize Fitting Shells to Create Garments in Any Style by Sara Alm
- http://www.frederickspassage.com/new_frederickspassage_023.htm
- https://www.the-sustainable-fashion-collective.com/introduction-to-pattern-cutting/how-to-make-a-master-block-for-garment-sewing
- https://www.dresspatternmaking.com/blog/what-is-the-difference-between-a-block-and-a-pattern
Author of this Article:
Md. Mahedi Hasan
B.Sc. in Textile Engineering
Textile Engineering College, Noakhali.
Email: mh18.bd@gmail.com
