Experiment name:
Prepare a Production Pattern of Front Part and Back Part of a Trouser.
Objectives:
- To know how to make a production pattern of trouser.
- To know about the importance of trouser production pattern.
Theory:
A pattern is the actual copy of different parts of a garment that is made by cutting board paper after sketching on it. According to this pattern cloth is cut and then garment is made. For industrial production different patterns are made for different size and a marker is made with these different patterns for a large-scale production. Then many cloths are cut at a time and finally garments are made by large number of workers in garments industry.
Functions:
Now making a pattern has some functions. These are as follows:
- To sketch the parts primarily according to the body on paper.
- To make pattern for different size by increasing measurements.
- To make a marker for large-scale production.
- To use these patterns made by standard body measurement for many times.
- Finally to save time and money to make fast and cheaper production.
…Parameter Measurement
- Waist 78 cm
- Seat 98 cm
- Body Rise 27.2 cm
- Inside leg 80 cm
- Bottom width 24.5 cm
- Waistband depth 4 cm
The above parameters are discussed below:
1. Waist: It is the joint place of the upper body and lower body of human.
2. Seat: There is a point at the bottom center of a trouser that is called cross point. Now the seat is about 6-7 cm above this cross point.
3. Body Rise: Body Rise is the sum of front rise and back rise.
4. Inside leg: The measure along the sewn from the cross point to the bottom.
5. Bottom width: The diameter of the bottom of a trouser.
6. Waistband depth: It is the depth of waistband where the belt is we wear the belt.
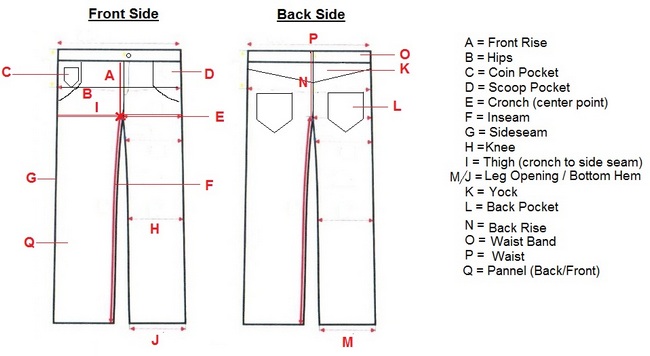
Different parts of a trouser:
A trouser has the above 6 parts. There are two sides of leg such as (1) Top side and (2) Bottom side

Apparatus:
- Board paper – 2 pieces
- Pencil 2B – 2 pieces
- Eraser – 1 piece
- Meter scale – 1 piece
- Set square – 1 piece
- Calculator
- Scissor – 1 piece
Preparing a production pattern of front part of a trouser:
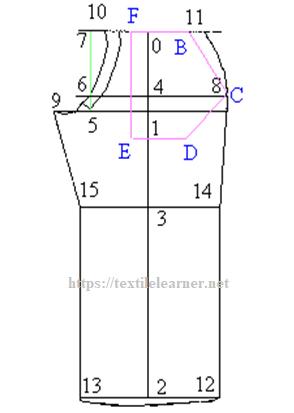
At first take a board paper and spread it on a flat table. Mark a point at the left top corner of board paper keeping space from top about 1 cm and from left 21 cm. Give this point number 0.

Now from 0 draw 3 lines at right angles to each other to the bottom, right and left sides. Then;
0-1 Body rise 27.2 cm + 1 cm. Spread the line both right and left side at right angle.
1-2 Inside leg 79 cm. Spread the line both right and left side at right angle to 1-2 line.
2-3 ½ of (1-2) + 5 cm. Spread the line both right and left side at right angle to1-2 line.
1-4 ¼ of body rise. Spread the line both right and left side at right angle to 0-1 line.
1-5 1/12 of seat + 1.5 cm. Draw a normal from 5 on 1-5 line that indicate 6 & 7 points.
6-8 ¼ of seat + 2 cm.
5-9 1/16 of seat + 0.5 cm.
7-10 1 cm. Draw front curve adding 9, 6 & 10 points.
10-11 ¼ of waistband + 2.5 cm.
2-12 ½ of bottom width.
2-13 ½ of bottom width.
Then joint 12-14 and 13-15 with straight lines. During making curve 11-8 expanding 0.5 cm at outside and 8-14 compressing 0.5 cm at inside lines are drawn. During making curve 9-15 compressing 1 cm at inside lines are drawn.
Preparing a production pattern of back part of a trouser:
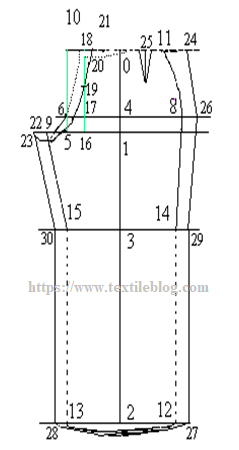
At first take a board paper and spread it on a flat table. Mark a point at the left top corner of board paper keeping space from top about 1 cm and from left 21 cm. Give this point number 0.

Now from 0 draw 3 lines at right angles to each other to the bottom, right and left side. Then;
0-1 Body rise 27.2 cm + 1 cm. Spread the line both right and left side at right angle.
1-2 Inside leg 79 cm. Spread the line both right and left side at right angle to 1-2 line.
2-3 ½ of (1-2) + 5 cm. Spread the line both right and left side at right angle to1-2 line.
1-4 ¼ of body rise. Spread the line both right and left side at right angle to 0-1 line.
1-5 1/12 of seat + 1.5 cm. Draw a normal from 5 on 1-5 line that indicate 6 & 7 points.
6-7 ¼ of seat + 2 cm.
5-9 1/16 of seat + 0.5 cm.
7-10 1 cm. Draw front curve adding 9, 6 & 10 points.
10-11 ¼ of waistband + 2.5 cm.
2-12 ½ of bottom width.
2-13 ½ of bottom width.
5-16 ¼ of 1-5. Draw a normal from 16 on 1-16 line that indicates 17 & 18 points.
19 Mid-point of 16-18.
18-20 2 cm.
20-21 1 cm.
9-22 ½ of 5-9 + 0.5 cm.
22-23 0.5 cm.
Then draw beck fork adding 23, 19 & 21 points.
17-26 ¼ of waist + 4.5 cm.
25 Mid-point of waist (21-24). Draw a 12 cm length line from 25 point at the bottom at right angle to 21-24 line and make 2.5 cm width dart.
17-26 ¼ of seat + 3 cm.
12-27 2 cm.
13-28 2 cm.
14-29 2 cm.
15-30 2 cm.
Then draw side seam adding 24, 26, 29 & 27 points and draw inside leg adding 23, 30 & 28 points. Mark a point D at 12 cm distant from point 25. This is the mid-point of face for making back pocket. At mid distant of 12 cm indicate the width of pocket 14 cm. Now adding 5 cm hem allowance the topside and under side patterns are cut.
Precautions:
- The table should be flat and smooth.
- The pencil used should be soft and sharp.
- The eraser should be clean.
- During drawing the line should be drawn at a time.
- No over drawing is allowable.
- Measurement should be taken carefully.
- To draw normal set square should be used.
- The scissor should be sharp.
- When cutting the seam should be cut at a time otherwise rough edge is produced.
Conclusion:
Stillness, technical knowledge, analytical power of drawing and special ability on technology of making garments are necessary for pattern making. Special care is very essential here because if any fault is occurred during making pattern such as design or measure or lack of any piece and if these faults are not corrected before marker making then the whole production is cancelled. So we should have clear idea and sufficient knowledge on pattern making and should be very careful during pattern making.
You may also like:
- How to Make a Shirt Pattern from Measurements
- Men’s Pants Pattern Drafting from Measurement
- How to Make a Master Pattern and Using in Design
